Introduction
Over the years, content creators and broadcasters have accumulated large libraries of assets in analog formats. With the switch to the digital workflow, there is a critical need to digitize all these assets because of multiple reasons:
- Risk of losing the asset forever if not digitized
- Preservation of asset for posterity, since digital format offers immunity from degradation over time
- Getting the asset ready to be used and monetized in today’s digital workflows
- Space and operational costs optimization
As a result, the digitization of analog tapes and archiving into digital libraries is critical to complete the transition to the file-based digital world. Post digitization, the content becomes the master – the analog tapes are thrown away. The asset, however, is only as good as the digitization process. What if the process was faulty, or there were errors introduced during the digitization process itself – the tape head was not aligned, the tape was read twisted, there was audio and video drift, or some audio track went completely missing, color bleeding happened, or maybe there was too much hue or red in the ingested material, or the tape head was not clean and it inserted a vertical line on all the frames – the possibilities of things going wrong are immense. And all of these are known to happen. If the process is faulty in anyway, the loss is immense – priceless assets will be lost forever. So what does the archiving process rely on – eyeball QC of the ingested content. But with thousands of hours of content to be digitized, manual QC is neither a practical nor a good option. The manual process is unreliable and is fraught with errors. It lacks consistency and with human fatigue setting in, it tends to be unreliable. Further, there are several errors that are not human detectable, but only machine detectable in the file-based digital workflows. Additionally, metadata checking can be erroneous – the asset with wrong metadata may also be practically lost in the archives, never to be retrieved when needed.
To overcome all the shortcomings, auto QC is now an essential and central part of the digitization workflow. The process is fast and efficient, consistent and reliable. When coupled with a manual review process on random and/or erroneous digitized content, the results are vastly improved in terms of the digitized content quality. Good auto QC tools with deep video quality checks for analog dropouts are increasingly deployed in the tape archiving process. Auto QC quality checks need to be enhanced to handle many digitization specific issues. Sensitive and detailed video dropout checks are critical for good archiving and one cannot take shortcuts with simple file-checking tools – industry grade QC tools with in-depth video dropout checks specially developed for analog tape ingest need to be deployed. A word of caution – the field of video dropouts is a subject of R&D with several checks still being evolved. This paper explores some of the checks in depth and how auto QC is being deployed in the digitization workflows.
The Need for Digitization and the Process
Most archives, broadcasters, universities, governments and television stations have thousands of hours of content accumulated and stored in analog tapes over the years. A typical broadcaster may have nearly 100,000 to 200,000 tapes of one hour duration collected over a ten-year period. While a few stations might have Super 8 or U-Matic tapes, majority of the tapes are a mix of Betacam (SP/SX Digital/IMX), XDCAM or HDCAM.
Preservation of the tapes requires not only space, maintaining correct tags, sorting of the tapes in correct sequence (like all sequence of sports together), the mere number of tapes creates a huge problem for the management to effectively use the tapes when needed. Also, the quality of the tapes deteriorates with time due to the inherent nature of magnetic tapes. In many cases the recoverability of the programs from the old tapes can no longer be guaranteed. Maintaining the tapes is a costly affair while the quality of the content is still not guaranteed. The digital workflow offers a solution to this.
Once tapes are digitized, facilities can achieve multiple benefits from the same. These include:
- Preservation of assets without the fear of quality loss or degradation
- Optimization of space and operational costs – retaining large archives of tapes in temperature and humidity controlled spaces is expensive while storing digital content in files is a lot less expensive
- Faster access and retrieval from the archives with enhanced metadata search capabilities
- Online content for new audiences and monetization possibilities
Facilities are fast migrating to complete digital and file-based workflows and getting rid of the old tape archives.
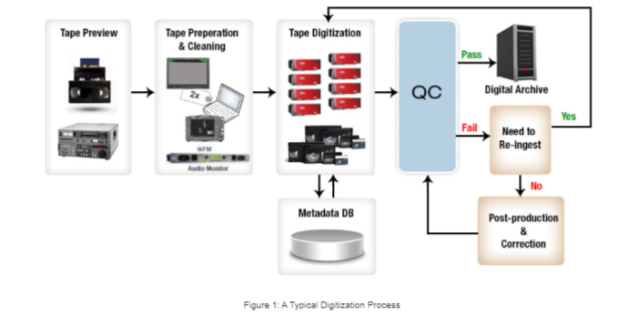
Figure 1 below provides a typical digitization process deployed during migration.

Stage 1. Tape Preview
At this stage, the different type of tapes (IMX, Betacam, HDCAM, XDCAM etc.) are sorted and tagged. Tapes are also physically checked for tape quality, presence of any foreign body in the tape, physical damage, tape twisting etc. If some of the important tapes are found to be damaged considerably, the tapes are usually sent to external specialist for restoration.
Stage 2. Tape Preparation and Cleaning
The tapes identified and sorted for digitization are moved to the ingest area at least 24hours before the actual ingestion of the tapes to avoid sudden expansion/contraction of the tapes. The ready tapes are then loaded in a tape cleaning machines to remove the dust and residuals like oxide deposits. With a huge number of tapes to be digitized, barcode labels are generally put on the tapes for better tracking and mapping of the metadata to the assets. Barcodes are also used by the downstream tools to automatically select the transcode profile during the digitization process.
Stage 3. Digitization of Tapes
At this stage, the tapes are played back and the ingested digitized content is encoded to house formats like Jpeg2000, AVC Intra etc. For large scale digitization, automated robots are deployed which can feed the tapes to VTR automatically from the stacked tapes using barcodes. Apart from creating the digitized files, a database containing the metadata is also updated for the digitized assets. A low-res proxy file is also generated along with the hi-res files.
Stage 4. Quality Checking
The quality of the ingested content must be checked to ensure proper ingestion. Post digitization, the digital content becomes the master and the tape becomes redundant. It is therefore essential to ensure that the right quality has been achieved in the digital master, before the tape is thrown away. If the content volume is low, one may rely on eyeball or manual QC to check the digitized content quality. However, with hundreds of hours of digitized content, manual QC is not a practical option. The manual process is also fraught with errors:
- Manual QC lacks consistency
- Some errors are not perceptible, but manifest themselves only during playback on some equipment
- Human fatigues sets in, leading to unreliable QC process
- Metadata checking can be erroneous – the asset with wrong metadata may also be practically lost in the archives, never to be retrieved when needed
Large scale digitization hence relies on auto QC tools to assist in the quality checking process. However, as we will see in the next section, there are a host of issues that can crop up in the storage of tapes and the playback process, which impact the video quality of the digitized assets. Similar issues can arise in the audio as well.
All these can lead to various different kinds of artefacts in the ingested digitized content. These artefacts are classified as “analog dropouts” in the video and the associated audio. A good auto QC tool should be able to reliably and accurately detect such artefacts. While one can identify these artefacts with visual inspection, identifying all such issues automatically through auto QC tools is still a subject of research and a lot of R&D is being done on the same (we will go into more details on this in the next section). Some of the advance auto QC tools provide a higher degree of reliability, accuracy and coverage of these analog artefacts, and are much better suited for deployment in the digitization workflow.
The auto QC process can be complemented with a manual review process to finally accept or reject the digitized content.
Stage 5. The Archiving Process
Once the digitized content is accepted, it is then archived using the selected archiving software. Metadata is updated, along with the proxy file. The process is complete and the corresponding tape can be discarded.
The Auto QC Process
As discussed above, auto QC is now an essential and central part of the archiving workflow. The auto QC process is fast, efficient, consistent and reliable. When coupled with a manual review process on random and/or erroneous digitized content, we achieve higher levels of productivity with vastly improved results.
Figure 2, below, shows a typical auto QC workflow in a digitization project.
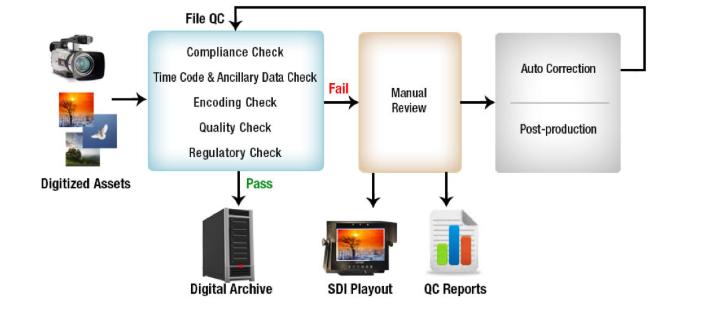
There are mostly four types of checks that are done as part of a quality checking process on digitized files:
- Checking the compliance of the generated content
- Checking for timecodes and metadata
- Checking the baseband quality in audio and video
- Checking for encoding/transcoding errors, if content is compressed
Compliance and metadata checking is a straightforward process needed to ensure that digitized content will work with all downstream tools. It is similar in nature to the checking done in current file-based workflows. The real complexity comes with ensuring that baseband quality of the digitized content is above the defined and agreed to threshold level. This becomes even more challenging when the same has to be done reliably with auto QC tools. Video issues can manifest themselves in different ways, and each one of them requires deep R&D to detect them reliably and accurately. With one large broadcaster, we saw over 50 different types of video quality issues in the digitized tapes. In the next section, we describe some of these in more details.
Quality Issues and Detection
The information embedded within tapes is in the form of voltage signals. The formation of each pixel, frame or picture is attributed by stored signal values on magnetic tapes. Alteration in natural variations in these signal values will lead to incorrect color values for captured pixels and cause errors in formation of fields, frames or pictures. These alterations are caused due to mishandling, ageing and improper maintenance of tapes. These can also be due to errors within the digitization process being used. The resulting video artefacts in this way are collectively termed here as analog dropouts. Some examples are blotches, scratches, miss-tracking, head clog, skew error, horizontal/vertical sync pulse loss, etc. The following sections will discuss some of the commonly observed analog video dropouts in further detail.
Horizontal / Vertical Sync Pulse Loss
A video frame consists of multiple horizontal scan lines spread across the vertical resolution. A specific voltage level exists at the end of each scan line indicating its end and start of the next scan line. Any variation in the voltage level (due to noise) will shift content lines, perceptually viewed as horizontal lines. This is shown in the snapshot below (Figure 3 a).
Vertical sync pulse is another such voltage level controlling the start/end of a new video frame. Any deviation in the voltage level will disturb the start of the formation of the next frame. Vertical sync pulse loss merges the two adjoining frames at the frame boundary (Figure 3b).
Skew Error
A magnetic tape can have dimensional changes due to continuous expansion or shrinkage of the tape surface over time. Due to this, the recorded tracks are affected by changes in length and angle resulting in misalignment with respect to the playback head. During playback/recording, this loss in alignment will shift a band of scan lines at the top/bottom of the picture. This horizontal shifted portion of the video frame at the top or the bottom part is termed as Skew Error (Figure 4).

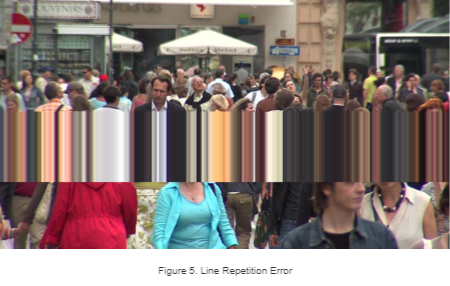
Line Repetition Error
An analog to digital conversion device gets the video data in the form of scan lines. The buffers that store each scan line data are updated regularly after each sample and hold duration. The line repetition error is caused due to issues in controlling the signals – the current scan line is not captured and is replaced by the previously fetched scan line. This error in the control signal continues for a while and the same is manifested as a repeated set of horizontal content lines. The artefact is shown in Figure 5.
Blotches
Blotches occur due to presence of dirt/sparkle on the surface of a magnetic tape. Dirt/blotches disrupt the reception of signals during video data capture. The area for which the data is not received, appears as white or black spots. Snapshot of the video frame with blotches is shown in Figure 6.
Scratches
Scratches appear in the video frame due to removal of oxide on the tape surface. The loss of oxide is due to wear and tear after prolonged or continuous usage of a tape. Generally, these scratches are in the form of thick horizontal line with some break at the boundary. The artefact is shown in Figure 7 below.

Chroma Phase Error
Composite video signals consist of chrominance components combined with luminance component using the phase modulation method. Any deviation in the phase will affect all the constituent components. With the phase error, the hue and saturation for the pixel colors may change and this will result into deviation of the colors from its natural values e.g., skin color, natural color of leaves or flowers sky etc. One of such examples is shown in Figure 8.
Dot Crawl / Rainbow Artefact
While capturing from a tape using composite signals, sometimes luma can be misinterpreted as chroma or vice versa. If chroma is treated as luma, the resulting artefact is termed as Dot Crawl. On the other hand, if luma is treated as chroma, the resulting artefact is termed as Rainbow Artefact.
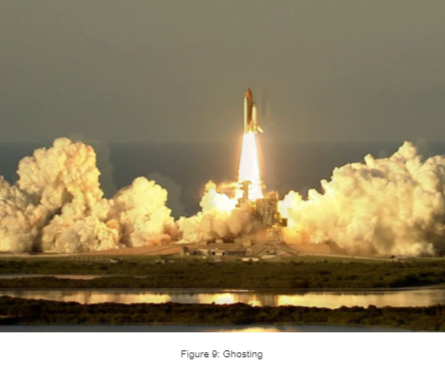
Ghosting
The ghosting artefact is perception of weak shadows around the edges of the primary visible objects within a scene. It happens due to transfer of magnetic signals across the adjacent tapes. A snapshot frame for this error is shown in Figure 9.
Apart from the above listed set of errors, other errors may also get introduced while capturing color values corresponding to each of the pixel location in a frame. In some cases, values are not retrieved at all; localized patches are created abruptly within the content. If the captured values are different from its natural value, video signal level and out-of-gamut errors are introduced in the captured video sequence. Apart from these errors, different kinds of noise or noise patterns can be perceived due to noise introduced while capturing analog signals.
Fortunately, there are processes and tools to correct not all but some of the errors introduced after analog to digital conversion. These tools or processes consider specialized steps to correct the tape device or the conversion process itself. There are post-processing tools as well to remove any noise in the digitized content, to correct the hue / saturation / balance / contrast of colors etc. But before applying any such correction step, it is required to know if there is an error and what type of error it is. The knowledge about the type of errors will help in selection of the correction steps to be followed.
Similar to videos, audio samples too are stored as voltage signals on magnetic tapes. Any aberration while capturing the audio signal during the digitization process can lead to audio distortion of different types as discussed below.
Audio Click/Audio Crackle/Transient Noise
Click/Crackle/Transient Noise/ Glitches are introduced due to scratches and dust on the surface of a tape. These are localized degradation that only affect certain groups of samples and thus cause a discontinuity in the waveform.
Scratches lead to disrupted audio samples during of the digitization process. These are perceived as ticking/popping/scratchy kind of noise lasting for a very small duration.
Audio Dropout
Audio Dropout is defined as distortion in audio signals in which silent frames of small duration (from 4ms to 300ms) are introduced in midst of normal audio data. It is characterized by abrupt fall in the signal level at the event of audio drop and abrupt rise at the end of audio drop frame.
Audio Dropouts are mostly introduced during digitization due to damage appearing on the tape. If a certain part of the tape is damaged, it won’t be possible for the head to read the corresponding audio data resulting in audio loss for that specific duration.
In addition to the above defects, the digitization process can also cause Audio Clipping. Because of dust and dirt contamination, it is possible that voltages become so high that it causes few of the audio samples to go above the legal range of 0 dB.
For detection of audio defects, checks like loudness checks, audio dropout, audio clipping, checking for different type of audio noises are very common during the quality checking process.
If closed caption and burnt-in subtitles are present in the content, advanced quality checking tool will not only check for their consistency and dropout, but it will also make sure they are present in safe area of the screen.
Unlike the errors in compressed digital data, the errors in analog medium are difficult to model. The analog data errors are random and do not follow a known pattern. This is also due to variations in the conversion processes or varieties of electro-mechanical components used inside tapes. Because of this uncertainty, detection of these artefacts is quite tedious. Highly specialized image and video processing concepts and algorithms are required for accurate and reliable detection of errors in the digitized data.
The Challenges Faced by Auto QC Tools
Selection of a correct auto QC tool for digitization is not only critical, but it has direct impact on the quality of the digitized content. A good auto QC tool can make the digitization process more efficient by detecting issues accurately and reliably. Algorithms to detect analog errors are more complex than that of digital errors. The detection algorithms need to consider and model various kind of non-linear processes followed during analog to digital conversion. Error detection algorithms have been developed for detecting some but research is continuing for the difficult ones where it is complex to model the actual error context. The auto QC tool you deploy in your workflow will provide benefits which are only as good as the depth and accuracy with which it detects such analog dropouts. Some QC tools just do a lip service in the name of detecting such issues, and it is advised that a proper tool be selected after due testing of the results. Fortunately, there are some industry grade QC tools, with in-depth video dropout detections available now. These tools have exhaustive checks dedicated to the analog tape ingest process and have been successfully deployed at large archiving projects.
The digitization of tapes and archiving to digital formats is a necessity to complete the transition to the file-based digital workflow. During this process, it is critical to use the right set of tools to ensure the quality of the content being archived. Artefacts can manifest in multiple ways in these tapes and need to be detected. Detection of these artefacts called analog dropouts is complex and several deep algorithms have been developed for the same. While a lot more research needs to be done to cover a larger set of analog dropouts, using the right auto QC tool during the archiving process helps detect these complex analog errors more accurately and reliably, and enables you to preserve and deliver high quality of the generated content.
Thought Gallery Channel:
Tech Talk