It seems that nonlinear editing systems, like Adobe Premiere, Apple FCP X, Lightworks, Vegas and Blackmagic Resolve are being updated almost weekly. At first, I was overjoyed with the frequent updates. It got to the point where I would see a new codec released on a Monday and by Friday you could edit with it (maybe a slight exaggeration, but pretty close to the truth). Unfortunately, this didn’t always mean the updates would work.
One thing that I have learned over the last decade is that reliable software is worth its weight in gold, and one NLE that has always been reliable in my work is Avid Media Composer. While Media Composer isn’t updated weekly, it has been picking up steam and has really given its competitors a run for their money.
With Avid Media Composer’s latest updates, including 8.5 and all the way through 8.6.1, we are seeing the true progression of THE gold standard in nonlinear editing software. From the changes that editors have been requesting for years, like the ability to add a new track to the timeline by simply dragging a clip, all the way to selecting all clips with the same source clip color in the timeline (an online editor’s dream — or maybe just mine), Media Composer is definitely heading in the right direction. Once they fix options, such as the Title Tool, I am sure many others will be in the same boat I am. Even with Adobe’s latest update news of Team Projects, I think Avid’s project sharing will remain on top, but don’t get me wrong, I love the competition and believe it’s healthy for the industry in general.
Digging In
So how great are the latest updates in Media Composer? Well, I am going to touch on a few that really make our lives as editors easier and more efficient, including the new Source Browser; custom-sized project creation Preset Manager; Audio Channel Grouping; grouping clips by audio waveform; and many more.
For simplicity’s sake I won’t be pointing out which update contained exactly what, so let’s just assume that you and I are both talking about 8.6.1. Even though 8.6.2 was released, it was subsequently pulled down because of a bad installer and replaced by 8.6.3. Long story short, I did this review right before 8.6.3 was released so I am sticking to 8.6.1. You can find the read me file for any 8.6.3 related bug fixes and feature updates, including Realtime EQ and Audio Suite Effects.
Source Browser
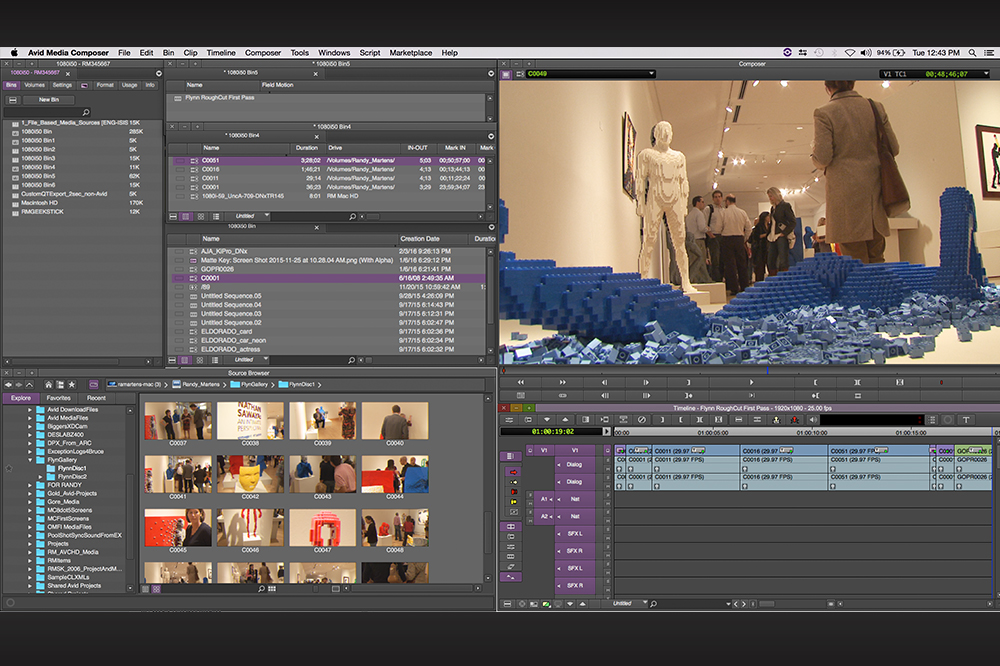
Let’s take a look at the new Source Browser first. If you have worked in Premiere Pro before then you are basically familiar with what the Source Browser does. Simply put, it’s a live access point from within Media Composer where you can either link to media (think AMA) or import media (the traditional way). The Source Browser is great because you can always leave it open if you want, or close it and reopen it whenever you want. One thing I found funny is that there was not a default shortcut to open the Source Browser — you have to manually map it.

Nonetheless, it’s a fast way to load media into your Source Monitor without bringing the media into a bin. It even has a Favorites tab to keep all of the media you access on a regular basis in the same place — a good spot for transition effects, graphics, sound effects and even music cues that you find yourself using a lot. The Source Browser can be found under the Tools menu. While I’ve seen some complaints about the menu reorganization and the new Source Browser, I like what Avid has done. The updated layout and optimized menu items seem to be a good fit for me, it will just take a little time to get used to.
Up next is my favorite update to Media Composer since I discovered the Select Right and Select Left commands without Filler and how to properly use the extend edit function: selecting clips in the timeline based on source color. If you’ve ever had to separate clips onto different video and audio tracks, you will understand the monotony and pain that a lot of assistant editors and conforming editors have to go through. Let’s say you have stock footage mixed in with over two hours of shot footage and you want to quickly raise all of the clips onto their own video layer. Previously, you would have to move each clip individually using the segment tool (or shift + click a bunch of clips), but now you can select every clip with the same source color at once.
First, you should (or at least I recommend that you should) enable Source Color in your timeline, but you don’t have to for this to work. Second, you use either the red or yellow segment tools or alt (option) + click from left to right over the clip with the color that you want to select throughout the timeline. Once the clip is selected you will right click on the clip. Under the Select menu, click on Clips with the Same Source Color. Every clip with that same color will be selected and you can Shift + CTRL drag the clips to a new track. Make this a shortcut and holy cow — imagine the time you will save!
Immediately, I think of trouble shots that might need a specific color correction or image restoration applied to them like a dead pixel that appears throughout a sequence. In the bin, color the trouble clips one color, select them all in the timeline and bam you are ready to go, quickly and easily. This update is a game changer for me. Under the Select menu you will see a few other options like Offline Clips, Select Clips with No Source Color, Select Clips with Same Local Color, and even Reverse Selection.
Audio
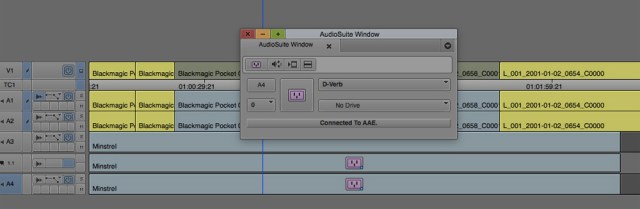
Now let’s jump into the audio updates. First off is the nesting of audio effects. I mean come on! How many times have I wanted to apply a Vari-Fi effect at the end of a music cue and add D-Verb on top of it?! Now I can create all sorts of slow down promo/sizzle reel madness that a mixer will hate me for without locking myself into a decision!
I tried this a few times expecting my Media Composer to crash, but it worked like a champ. Previously, as a workaround, I had to mixdown the Vari-Fi audio (locking me into that audio with no easy way of going back) and apply the D-Verb to the audio mixdown. This isn’t the cleanest workflow but it guaranteed my Vari-Fi would make it into the mix. Now I guess I will have to trust the mixer to not strip my audio effects off of the AAF we send them.
Digging a bit further into the audio updates for Media Composer 8.5 and 8.6, I found the ability to add up to 64 tracks of audio and, more specifically, 64 voices. Sixty-four voices can be laid out in these possible combinations: 64 mono tracks, 32 stereo tracks, 10-5.1 tracks plus four mono tracks or even eight 7.1 tracks.
Let’s be honest — from one editor to another — do we really need to use all 64 tracks of audio? I urge you to use this sparingly, and only if you have to. No one wants to be scrolling through 64 tracks of audio. I am hesitant to totally embrace this, because while it is an incredible update to Media Composer, it allows for editors to be sloppy, and nobody has time for that. Also, older versions of Media Composer won’t be able to open your sequence as they are not backwards compatible with this.
My second favorite update in Media Composer is Audio Groups. I am a pretty organized (a.k.a. obsessive-compulsive editor), and with my audio I typically lay out voiceover and ADR on tracks 1-2, dialogue on 3-6, sound effects on 7-12 and music on 13-16.
These have to be fluid, and I find that these fit my screen real estate well. They keep my audio edit as tidy as possible, although now with 64 tracks I can obviously expand. But one thing that always sucked was having to mute each track individually or all at once. Now, in the Audio Mixer you can easily create groups of audio tracks that can be enabled and disabled with one click instead of individually selecting each audio track. For instance, I can group all of my music tracks together to toggle them off and on with one check box. In the Audio Mixer there is a small arrow on the upper left that you will twirl down, select the audio tracks that you want to group, such as tracks 13-16 for music, right click, click Create New Group, name it and there you go — audio track selection glory.
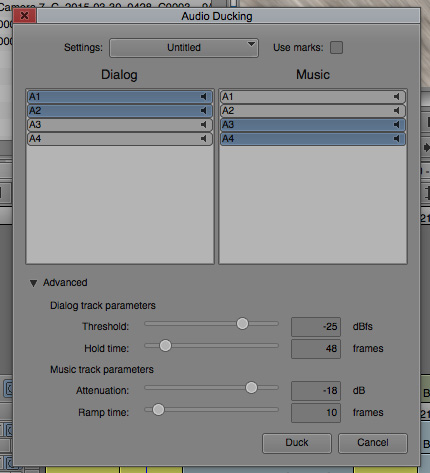
Last in the audio updates is Audio Ducking. When I think of Audio Ducking I think of having a track of voiceover or ADR over the top of a music bed. Typically, I would go through and either add audio keyframes where I need to lower the music bed or create add edits, lower the audio in the mixer, apply a dissolve between edits and repeat throughout the segment.
Avid has really stepped its game up with Audio Ducking because now I can specify which of my dialogue tracks I want Avid to calculate for when my music bed is playing. You can even twirl down the advanced settings, adjust threshold and hold time for the dialogue tracks, as well as attenuation and ramp time for the music bed tracks. I tried it and it worked. I won’t go as far as to say that you should just use that instead of doing your own music edits, but it is an interesting feature that may help a few people.
Wait, There’s More
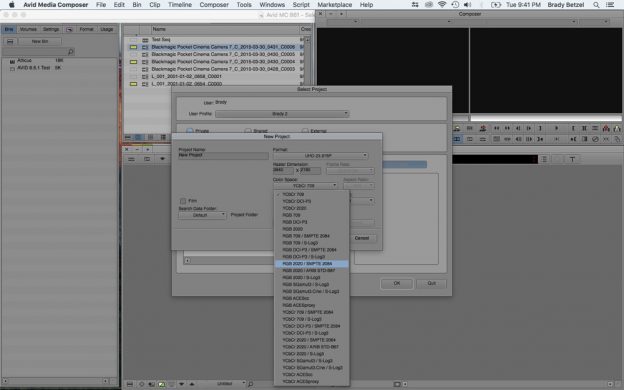
There were a few straggling updates I didn’t touch on you will want to check out. Avid has added support for HDR color spaces, such as RGB DCI-P3, RGB 2020 and many more. Once I get my hands on some sweet HDR footage (and equipment to monitor it) I will dabble in that space.
Also, you can now group footage by audio waveform. While grouping by audio waveform is an awesome addition, especially if you have previously used Red Giant’s PluralEyes and feel left out because they discontinued AAF support, it lacks a few adjustments that I find absolutely necessary when working with hours upon hours of footage. For instance, I would love to be able to manually sync clips that don’t have audio loud enough for Avid to discern properly and create a group. Even more so, for all grouping I would really love to be able to adjust the group after it has been created. If after the group was created I could alter it inside of a sequence that would immediately reflect my changes in the group itself, I —along with about one million other editors and assistant editors — would jump for joy.
Lastly, the Effects Tab has been improved with its Quick Find search-ability. Type in the effect you are looking for and it will pop up. This is another game-changing feature to me.
Summing Up
For a while there I thought Avid was satisfied to stay the course in 1080p land, but luckily that isn’t the case. They have added resolution independence, custom project resolutions, and while they have added features to Media Composer — like Source Browser and the ever-improving Frame Flex — they kept their project sharing and rock solid media management at the top level.
Even after all of these updates I mentioned, there are still some features that I would love to see. Those include built-in composite modes in the Effects Pallette; editable groups; an improved Title Tool that will work in 4K and higher resolutions without going to a third-party for support; updated Symphony Color Correction tools; smart mix-downs that can inherit alpha channels; the ability to disable video layers but still see all the layers above and below; and many more.
If I had to use just one word to describe Media Composer, I would say reliable. I love reliability more than fancy features. And now that you heard my Media Composer review, you can commence trolling on Twitter @allbetzroff.
Thought Gallery Channel:
Creative Master Series